使用 Node.js 构建交互式命令行工具

使用 Node.js 构建一个根据询问创建文件的命令行工具。

当用于构建命令行界面(CLI)时,Node.js 十分有用。在这篇文章中,我将会教你如何使用 Node.js 来构建一个问一些问题并基于回答创建一个文件的命令行工具。
开始
首先,创建一个新的 npm 包(NPM 是 JavaScript 包管理器)。
mkdir my-script
cd my-script
npm init
NPM 将会问一些问题。随后,我们需要安装一些包。
npm install --save chalk figlet inquirer shelljs
这是我们需要的包:
- Chalk:正确设定终端的字符样式
- Figlet:使用普通字符制作大字母的程序(LCTT 译注:使用标准字符,拼凑出图片)
- Inquirer:通用交互式命令行用户界面的集合
- ShellJS:Node.js 版本的可移植 Unix Shell 命令行工具
创建一个 index.js 文件
现在我们要使用下述内容创建一个 index.js 文件。
#!/usr/bin/env node

const inquirer = require("inquirer");
const chalk = require("chalk");
const figlet = require("figlet");
const shell = require("shelljs");
规划命令行工具
在我们写命令行工具所需的任何代码之前,做计划总是很棒的。这个命令行工具只做一件事:创建一个文件。
它将会问两个问题:文件名是什么以及文件后缀名是什么?然后创建文件,并展示一个包含了所创建文件路径的成功信息。
// index.js

const run = async () => {
  // show script introduction
  // ask questions
  // create the file
  // show success message
};

run();
第一个函数只是该脚本的介绍。让我们使用 chalk 和 figlet 来把它完成。
const init = () => {
  console.log(
    chalk.green(
      figlet.textSync("Node JS CLI", {
        font: "Ghost",
        horizontalLayout: "default",
        verticalLayout: "default"
      })
    )
  );
}

const run = async () => {
  // show script introduction
  init();

  // ask questions
  // create the file
  // show success message
};

run();
然后,我们来写一个函数来问问题。
const askQuestions = () => {
  const questions = [
    {
      name: "FILENAME",
      type: "input",
      message: "What is the name of the file without extension?"
    },
    {
      type: "list",
      name: "EXTENSION",
      message: "What is the file extension?",
      choices: [".rb", ".js", ".php", ".css"],
      filter: function(val) {
        return val.split(".")[1];
      }
    }
  ];
  return inquirer.prompt(questions);
};

// ...

const run = async () => {
  // show script introduction
  init();

  // ask questions
  const answers = await askQuestions();
  const { FILENAME, EXTENSION } = answers;

  // create the file
  // show success message
};
注意,常量 FILENAME 和 EXTENSIONS 来自 inquirer 包。
下一步将会创建文件。
const createFile = (filename, extension) => {
  const filePath = `${process.cwd()}/${filename}.${extension}`
  shell.touch(filePath);
  return filePath;
};

// ...

const run = async () => {
  // show script introduction
  init();

  // ask questions
  const answers = await askQuestions();
  const { FILENAME, EXTENSION } = answers;

  // create the file
  const filePath = createFile(FILENAME, EXTENSION);

  // show success message
};
最后,重要的是,我们将展示成功信息以及文件路径。
const success = (filepath) => {
  console.log(
    chalk.white.bgGreen.bold(`Done! File created at ${filepath}`)
  );
};

// ...

const run = async () => {
  // show script introduction
  init();

  // ask questions
  const answers = await askQuestions();
  const { FILENAME, EXTENSION } = answers;

  // create the file
  const filePath = createFile(FILENAME, EXTENSION);

  // show success message
  success(filePath);
};
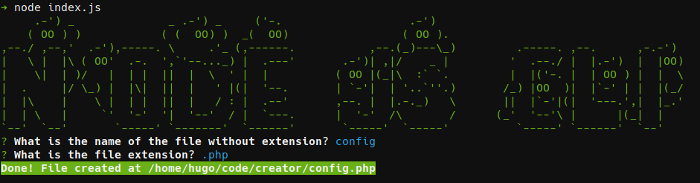
来让我们通过运行 node index.js 来测试这个脚本,这是我们得到的:
完整代码
下述代码为完整代码:
#!/usr/bin/env node

const inquirer = require("inquirer");
const chalk = require("chalk");
const figlet = require("figlet");
const shell = require("shelljs");

const init = () => {
  console.log(
    chalk.green(
      figlet.textSync("Node JS CLI", {
        font: "Ghost",
        horizontalLayout: "default",
        verticalLayout: "default"
      })
    )
  );
};

const askQuestions = () => {
  const questions = [
    {
      name: "FILENAME",
      type: "input",
      message: "What is the name of the file without extension?"
    },
    {
      type: "list",
      name: "EXTENSION",
      message: "What is the file extension?",
      choices: [".rb", ".js", ".php", ".css"],
      filter: function(val) {
        return val.split(".")[1];
      }
    }
  ];
  return inquirer.prompt(questions);
};

const createFile = (filename, extension) => {
  const filePath = `${process.cwd()}/${filename}.${extension}`
  shell.touch(filePath);
  return filePath;
};

const success = filepath => {
  console.log(
    chalk.white.bgGreen.bold(`Done! File created at ${filepath}`)
  );
};

const run = async () => {
  // show script introduction
  init();

  // ask questions
  const answers = await askQuestions();
  const { FILENAME, EXTENSION } = answers;

  // create the file
  const filePath = createFile(FILENAME, EXTENSION);

  // show success message
  success(filePath);
};

run();
使用这个脚本
想要在其它地方执行这个脚本,在你的 package.json 文件中添加一个 bin 部分,并执行 npm link:
{
  "name": "creator",
  "version": "1.0.0",
  "description": "",
  "main": "index.js",
  "scripts": {
    "test": "echo \"Error: no test specified\" && exit 1",
    "start": "node index.js"
  },
  "author": "",
  "license": "ISC",
  "dependencies": {
    "chalk": "^2.4.1",
    "figlet": "^1.2.0",
    "inquirer": "^6.0.0",
    "shelljs": "^0.8.2"
  },
  "bin": {
    "creator": "./index.js"
  }
}
执行 npm link 使得这个脚本可以在任何地方调用。
这就是是当你运行这个命令时的结果。
/usr/bin/creator -> /usr/lib/node_modules/creator/index.js
/usr/lib/node_modules/creator -> /home/hugo/code/creator
这会连接 index.js 作为一个可执行文件。这是完全可能的,因为这个 CLI 脚本的第一行是 #!/usr/bin/env node。
现在我们可以通过执行如下命令来调用。
$ creator
总结
正如你所看到的,Node.js 使得构建一个好的命令行工具变得非常简单。如果你希望了解更多内容,查看下列包。
在评论中留下你关于构建命令行工具的经验吧!
via: https://opensource.com/article/18/7/node-js-interactive-cli